

User guide15 min
Connect your CI/CD pipeline
Add one step to the end of your pipeline. After every deploy, PixyScan scans the address you just released, prints the health score in your build log, and fails the build if the score drops below the number you choose. Setting it up takes about 15 minutes.
Before you start#
Check these four things first. Each one is a common reason a first run fails.
| You need | Where to check | What it does |
|---|---|---|
| A Basic, Pro or Enterprise plan | Billing | On Free and Hobby the CLI & CI/CD tab shows a lock. See Billing to change your plan. |
| Admin access to the site | Members | Only a site's admins can see the CLI & CI/CD tab. Workspace admins are admins of every site. If you are not one, ask an admin to give you the role, or to follow steps 1 to 4 for you. See Members and roles. |
| The site added to PixyScan | Workspace overview | The pipeline scans a site you already added. If you have not added it yet, see Add a site. |
| A pipeline that deploys your site | Your CI provider | Any CI that can run Node.js 18 or later. This page covers GitHub Actions, GitLab CI, Bitbucket Pipelines, CircleCI and Jenkins. |
How it works, in plain words. Your pipeline (CI/CD) already builds your site and puts it live. You add one more step at the end. That step runs a small program called the PixyScan CLI. The CLI tells PixyScan which branch was just deployed. PixyScan scans the address that branch lives at, and the CLI prints the result in your build log.
If the health score is lower than the number you chose, called the score gate, the CLI ends with exit code 1. Every CI treats an exit code other than 0 as a failed step, so the build stops. Nothing is changed on your site, and nothing comments on your pull requests. The build log and the exit code are the whole result.
- Plan
- Basic, Pro or Enterprise
- Needs
- Node.js 18 or later in the CI job
- Uses
- One URL credit per page scanned, like any scan
- Waits
- Up to 5 minutes for the scan, unless you change it
Step 1: Create the client secret#
The client secret is a password that proves your pipeline is allowed to scan this site. Each site has its own.
- 1
Open the site's CLI & CI/CD settings
Open the site in PixyScan. In the sidebar, choose Settings under Manage, then open the CLI & CI/CD tab.
- 2
Press Create the secret
It is on the Client secret card. A window opens with your new secret. It starts with
sk_live_, followed by a long string of letters and numbers. - 3
Press Copy
This is the only time the secret is shown. PixyScan keeps only a one-way fingerprint of it, so nobody can show it to you again, our support team included.
Go straight on to step 2 and save it in your CI. If you need a minute, paste it into a password manager, not into a chat, an email or a file in your repository.
- 4
Press I have stored it, close
The button only works once you have copied the secret. The card now shows the start of the secret, when it was created, and when a pipeline last used it. Until your first run, Last used says Never.
app.pixyscan.com/w/…/s/…/settings?tab=sdk
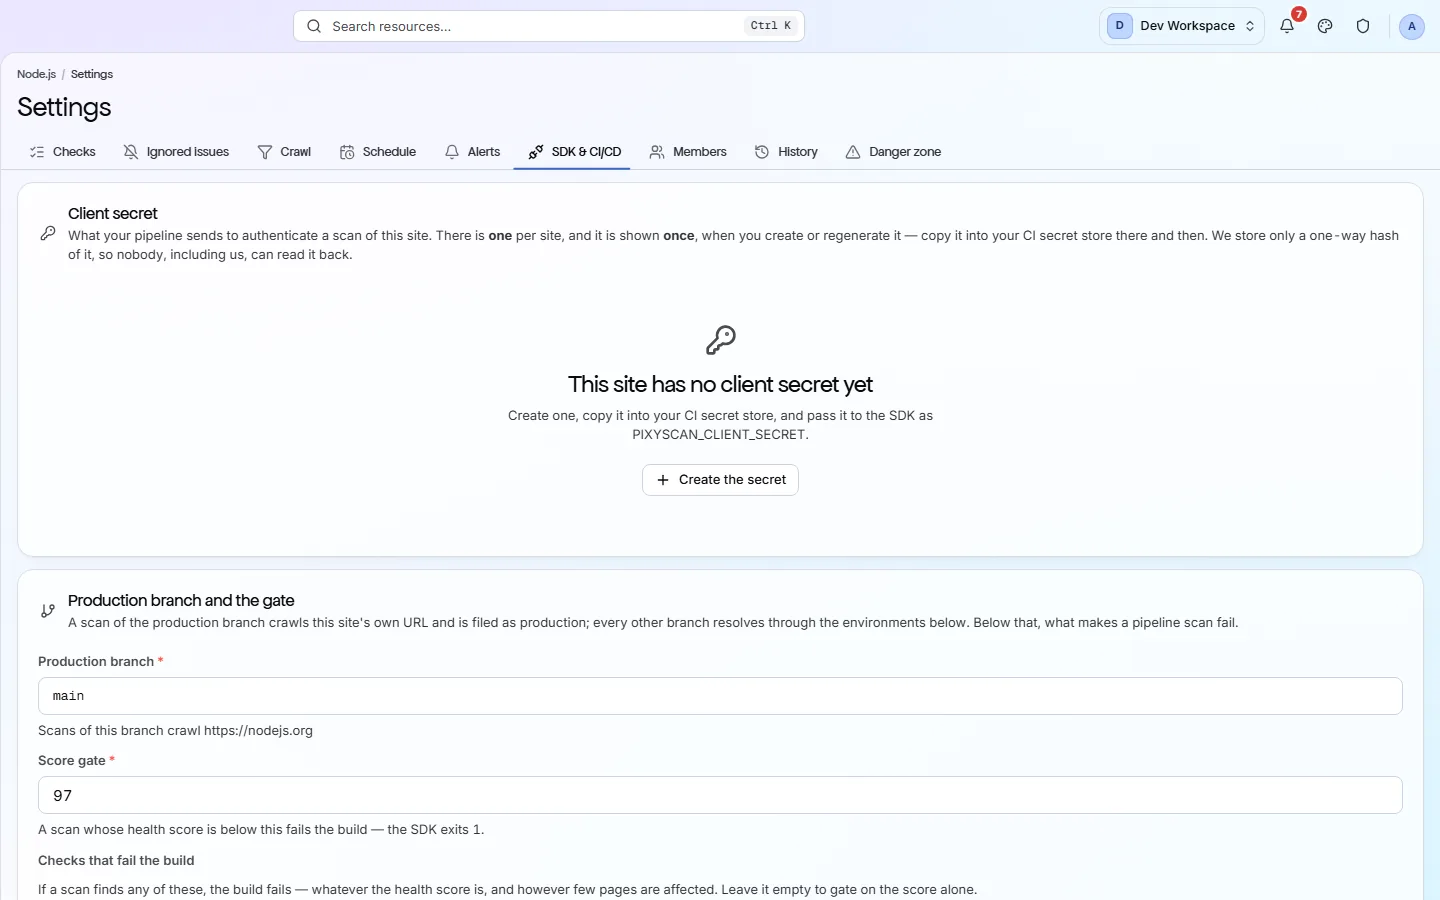
Lost the secret, or shared it by mistake?
Step 2: Save the secret in your CI#
Never paste the secret into a YAML file or commit it to your repository. Every CI has a private store for secrets. Save it there, named PIXYSCAN_SECRET.
| Your CI | Where to add it | What it does |
|---|---|---|
| GitHub Actions | Repository → Settings → Secrets and variables → Actions | Press New repository secret. Type PIXYSCAN_SECRET as the name, paste the secret as the value, and press Add secret. |
| GitLab CI | Project → Settings → CI/CD → Variables | Press Add variable. Type PIXYSCAN_SECRET as the key, paste the secret as the value, and make it masked, so it never shows in a job log. Leave Protect variable off unless every branch you scan is protected, because GitLab only gives protected variables to protected branches. |
| Bitbucket Pipelines | Repository settings → Pipelines → Repository variables | Type PIXYSCAN_SECRET as the name, paste the secret as the value, tick Secured, and press Add. |
| CircleCI | Project settings → Environment Variables | Press Add Environment Variable. Type PIXYSCAN_SECRET as the name, paste the secret as the value, and confirm. |
| Jenkins | Manage Jenkins → Credentials | Add a credential of the kind Secret text and paste the secret into it. Give it an ID you will recognise, such as pixyscan-secret. |
| Any other CI | Its secrets or variables page | Save it as a secret (masked) environment variable named PIXYSCAN_SECRET. |
Menus in these tools change from time to time. If one does not match, look for Secrets or Variables in your project's settings.
The name is up to you, as long as your pipeline step in step 5 uses the same one. This page uses PIXYSCAN_SECRET.
The secret has to be passed to the CLI
Step 3: Tell PixyScan which address each branch deploys to#
Your pipeline only sends PixyScan a branch name. This list tells PixyScan which address to scan for it, so a build of your staging branch scans your staging site, not your live one.
Your production branch always scans the site's own URL, the one you entered when you added the site. Every other branch you deploy needs an environment: a name, a branch and the address that branch is deployed to. If you only deploy one branch, check the production branch and go on to step 4.
- 1
Check the production branch
On the Production branch and the gate card, make sure Production branch is the branch that deploys your live site, such as
mainormaster. If you change it, press Save settings. - 2
Press Add environment
It is on the Which URL each branch scans card. Add one environment for each other branch you deploy, such as staging or a preview branch.
- 3
Fill in the three fields
Name is a label, such as Staging. It is shown in scan history and in the report the CLI prints.
Branch is the branch name, such as
develop, or a pattern, such asrelease/*.URL to scan is the address that branch is deployed to, such as
https://staging.example.com. PixyScan must be able to reach it from the internet, so private and local addresses are refused. If the site is behind a password, add its sign-in details on the Crawl tab. See Site settings. - 4
Press Add environment to save it
It appears as a row in the table. A site can have up to 20 environments. To change one later, edit its row and press Save environment.
| Branch rule | Example | What it does |
|---|---|---|
| Exact name | develop | Matches only the branch called develop. An exact name always wins over a pattern. |
| Pattern | release/* | * stands for any text, and it is the only wildcard. release/* matches release/2.4 and release/spring. When two patterns match, the more specific one wins. |
| No match | - | The run stops with exit code 2 and a message naming the branch. Add an environment for it, or have the pipeline send a branch that has one. |
Preview addresses that change on every build
Building from a Git tag?
v2.4.0, as its branch. Add an environment with the pattern v*, or have that job send main as its branch.Step 4: Choose when a build should fail#
Two settings decide it: the lowest health score you accept, and an optional list of checks that must never fail.
- 1
Find today's score
Open the site's Overview and note the health score of the latest scan, for example 82.
- 2
Type it in Score gate and press Save settings
Score gate is on the Production branch and the gate card. It takes a whole number from 0 to 100. A scan passes when its score is the same as the gate or higher.
- 3
Optional: add checks that fail the build
Under Checks that fail the build, open Add a check… and choose one, such as Broken internal links and pages. If a scan finds that check on any page, the build fails, whatever the score. The list saves as soon as you change it. Leave it empty to fail on the score alone.
- 4
Optional: exempt some pages from a check
Press the pencil on the check's row. Type a part of an address, such as
/legacy/, or a pattern, such as/blog/*, and press Enter. Press Save exemptions when the list is done.Exemptions only change the build. The problem is still reported on those pages in the app, and still counts towards the health score.
Change the default of 97
Step 5: Add PixyScan to your pipeline#
Add one PixyScan step to your pipeline. It must run after your deploy step, because PixyScan scans the live address, not your code.
Put the PixyScan step after the step that deploys your site, and give it the secret you saved in step 2. Find your CI below.
GitHub Actions. Add the step to the job that deploys your site, after the deploy and after a step that sets up Node.js. To watch it, open the repository's Actions tab and choose the run.
GitLab CI. Add a stage after your deploy stage. Stages run in order, so the scan starts only once the deploy has finished. GitLab gives every job the variables you saved, so there is nothing else to add. To watch it, open Build → Pipelines in the project and choose the PixyScan job.
Bitbucket Pipelines. Add a step after the deploy step. Steps run one after the other. By default the step runs on every branch, so limit it to the branches you deploy if you only want to scan those.
CircleCI. Add a job for the scan, and make it wait for the deploy job to finish.
Jenkins and other CIs. It works on any CI with Node.js 18 or later. The CLI reads the branch by itself only on GitHub Actions, GitLab CI, CircleCI, Bitbucket Pipelines and Vercel. Anywhere else it assumes main, so send the branch, and the commit, yourself. On Jenkins, add a stage after your deploy stage, in a multibranch pipeline whose agent has Node.js, and read the secret from the credential you saved in step 2.
Every run uses credits
Step 6: Run it and read the result#
Push a commit to start your pipeline, then open the PixyScan step's log.
While the scan runs, the log shows progress lines that start with [pixyscan-sdk]: Starting scan, Crawling pages with a count of pages, Analysing results, and finally Scan complete. How long it takes depends on how many pages the scan covers.
When it finishes, the CLI prints the PixyScan SEO Scan Report:
| Line | Example | What it does |
|---|---|---|
| Status | PASSED | PASSED or FAILED. This is the line to look at first. |
| Branch | develop | The branch the run used. |
| Commit | a1b2c3d | The commit that was deployed. On a tag build it also shows the release, such as v2.4.0. |
| Environment | Staging (preview) | The environment the branch matched in step 3. |
| URL | https://staging.example.com | The address that was scanned. |
| Health score | 84 / 100 | The score of this scan. n/a means the scan could not crawl the address. |
| Threshold | 82 | The score gate it was compared with. |
| Issues | 37 total | How many problems were found, with a line each for Critical, Important and Standard. |
| Suggestions | 12 | How many suggestions were found. Suggestions never fail a build. |
| Must not fail | 2 checks | Each check from your list in step 4, with ✓ if it was not found and ✗ if it was. |
The report gives counts, not the list of problems. To see each problem, open the site in PixyScan. The scan is in Scan history with the trigger CLI, named CI/CD Scan followed by the environment, the branch and the time. Then work through it from Issues, the same as any other scan.
| Field | Exit code | What it does |
|---|---|---|
| Passed | 0 | The score met the score gate, and no check on your list was found. The build carries on. |
| Gate failed | 1 | The score is below the gate, a check on your list was found, or the scan could not crawl the address. The report says which. This is the code that should stop a release. |
| Setup problem | 2 | Something in the setup is wrong: a missing or wrong secret, a branch with no environment, a plan without the CLI, an unknown check name, or a bad settings file. Fix it with the table under Troubleshooting and run it again. |
| Could not finish | 3 | PixyScan could not be reached, the scan did not finish in time, the workspace is out of URL credits, or another scan of this site is already running. Retry the step once the cause is cleared. |
Optional: keep the gate rules in your repository#
A file called pixyscan-settings.json lets your pipeline set its own score gate and list of checks, reviewed in pull requests like the rest of your code.
Put the file in the folder your pipeline step runs from, which is usually the top folder of your repository. The CLI finds it by itself and prints Using pixyscan-settings.json in the log.
pixyscan-settings.json
{
  "version": 1,
  "minScore": 85,
  "failOnIssues": [
    "Broken internal links and pages",
    {
      "issue": "Pages with no canonical tag",
      "excludePages": ["/legacy/*"]
    }
  ]
}| Field | If you leave it out | What it does |
|---|---|---|
| version | Must be 1 | The format of the file. Always 1. |
| minScore | The site's score gate | The lowest health score that passes, a whole number from 0 to 100. |
| failOnIssues | The site's list | Up to 200 checks that fail the build when found. Write each one by its title, as the app shows it. To exempt pages from one, write it as an object with issue and up to 50 excludePages, as in the example. |
Each value in the file replaces the site's setting for that run only. The list replaces the site's list as a whole: the two are not merged. A check title PixyScan does not recognise stops the run with exit code 2 and suggests the closest name.
Never put the secret in this file
Optional: record which commit was deployed#
Each scan from your pipeline can be labelled with the commit it ran for. On most CIs this happens by itself.
The CLI reads the commit on GitHub Actions, GitLab CI, Bitbucket Pipelines, CircleCI, Vercel and Netlify, with a link to it where the CI gives one. A tag build is also labelled with its tag, such as v2.4.0. The label is information only: it never changes the scan or whether the build passes.
With Search Console connected, each deploy of your production branch is marked on the site's clicks trend with its commit. If clicks drop sharply in the 3 days after a deploy, you get an alert. See Search impact.
Troubleshooting#
Find the message from your build log, then do what the last column says.
| The log says | Exit code | What it does |
|---|---|---|
| A client secret is required. | 2 | The secret did not reach the CLI. Check that the name in your CI's secrets and the name your pipeline step uses are exactly the same. On GitLab, check the variable is not protected while the branch is not. |
| Client secret should start with sk_live_ or sk_test_ | 2 | Something other than the secret was saved. Copy it again with no spaces or quotes around it. If you no longer have it, regenerate it in step 1. |
| Invalid client secret (401) | 2 | The secret was regenerated or deleted after you saved it. Create or regenerate it, and save the new one in your CI. |
| No environment is configured for branch … | 2 | Add an environment for that branch in step 3, or have the pipeline send a branch that has one. On a tag build, see the note in step 3. |
| CLI access is not included in your plan. | 2 | The workspace is on Free or Hobby. Move it to Basic or above on Billing. |
| This workspace has used all … URLs included in the … plan | 3 | The workspace has no URL credits left this period. Add credits or change plan on Billing, or scan fewer branches. |
| A scan is already running for this site. | 3 | A site scans one at a time. Wait for the running scan to finish, then run the step again. A run that timed out earlier leaves its scan running, so this often follows a timeout. |
| The step timed out | 3 | The scan took longer than the timeout. Raise the timeout, or lower the page budget on the Crawl tab of Site settings. The scan carries on in PixyScan, and its results appear in the app. |
| You cancelled the scan in the app | 3 | The CLI keeps waiting until the timeout, then stops. Run the step again when you are ready. |
| Health score n/a | 1 | The scan could not crawl the address. Check it is live and public, then open the scan in the app to see why. |
Does something here not match what you see in the app? Tell us